Potato noodle Stir Fry

Potato noodle Stir Fry. I love noodles different from rice, pasta, or bread. My children love the noodle dish. Thus, noodles are great for cold or hot weather. Stir fry is fun. With this dish, you add some vegetables, protein, and sauce. The sauce can add a lot of flavors.

Potato noodle Stir Fry Recipe

Potato noodle Stir Fry

Ingredients:

1/2 – 1 pack of potato noodle

1/2 – 1 head Sui Choi

sauce:

1 tbsp gluten-free soy sauce

1 tbsp mirin

1/2 tsp rice wine vinegar

1 tbsp oyster sauce

2 tsp brown sugar

Instructions:

  1. Firstly, in a small bowl, add gluten-free soy sauce, mirin, rice wine vinegar, oyster sauce, and brown sugar. Stir.
  2. Secondly, with a small pot, boil the water. Once the water is ready, add in the noodles. Let the noodles cook for 10 minutes or until the noodle has softened.
  3. Next, drain the water and the noodle under the cold water.
  4. Subsequently, prepare the vegetables.
  5. Finally, do cook the protein and add the vegetable. 
  6. Furthermore, add the noodles. And then, add the sauce to the pan. Stir to allow the sauce to coat everything.
Potato noodle Stir Fry

Types of noodle Stir Fir

Noodles that are good for stir fry are soba noodles, udon noodles, egg noodles, spaghetti, linguine, fettuccine, and rice noodle. Hence, gluten-free noodles that are gluten-free are gluten-free spaghetti, gluten-free linguine, gluten-free fettuccine, rice noodle, and potato noodle. For a tastier dish, marinate the protein for an hour before cooking time.

Do try potato noodle stir fry. If you enjoy stir fry, do try rice noodle stir fry. I would love to try more stir fry dishes like sesame chicken stir fry.

Protein Mini Muffin

Protein Mini Muffin. These small treats are fantastic for my children. And, my daughter could not stop eating them. Hence, muffins are sweet and tasty. Also, if this is high in protein made from almond flour, which is gluten-free.

Protein Mini Muffin Recipe

Protein Mini Muffin

Ingredients:

2 eggs

4 tbsp almond flour

1/2 cup chocolate chip (non-dairy)

1/4 cup maple syrup

1 tsp vanilla extract

dash of salt

Instructions:

  1. To begin, preheat the oven to 395 degrees F. Then, in a small bowl, add eggs, almond flour, baking powder, maple syrup, vanilla extract, and salt. Stir.
  2. Then, do fold the chocolate chip in the batter.
  3. Secondly, brush oil onto the muffin tin.
  4. Finally, bake for 10 – 12 minutes or use the toothpick
Protein Mini Muffin
Protein Mini Muffin

High Protein Option

For a protein option, there are many options to make changes to the flour. Thus, regular flour can be switched to a different one like a high protein flour. For example, flours like almond flour, peanut flour, and chickpea flour. Also, the above flours are gluten-free choices as well.

Therefore, do try this protein muffin. If you enjoy high protein breakfast, do try small bite-size snacks. I would love to try more healthy dishes like a gluten-free peanut butter quinoa bar.

Sweet Potato With Shredded Chicken

Sweet Potato With Shredded Chicken. This time I want to use more root vegetables in our diet. The sweet potato does store well and does last long. Also, they are a good source of fiber and minerals. The root vegetable is good for gut health. Surprisingly, it is good for eyesight.

Sweet Potato with Shredded Chicken Recipe

Sweet Potato with Shredded Chicken

Ingredient:

1 – 1 1/2 cup shredded chicken

1 clove of garlic ( minced)

1/2 onion (diced)

1 red pepper (diced)

2 sweet potato (peel and diced)

1 tsp chili powder

sprinkle salt and pepper

Instructions:

  1. First, take a pan or skillet to cook the chicken. Once cooked, set it aside.
  2. Clean the pan, add oil to saute the garlic. Next, add the onion. After the onion is soft. Then, add in the sweet potato. Stir the content.
  3. Hence, when the sweet potato is soft enough, add in the peppers. Season with salt and pepper.
  4. Finally, add in the chicken.
  5. Again, can add an egg on top of the potato.
  6. Enjoy
Sweet Potato with Shredded Chicken

Tasty Dish

This sweet potato dish can be versatile by having it for breakfast or lunch. Therefore, this dish can be elevated by adding a sauce such as a vinaigrette or a hollandaise sauce.

Do try Sweet Potato With Shredded Chicken. If you enjoy this dish, do try vegan stuffed peppers. I would love to try new vegan dishes like vegan risotto.

Fun Sushi Bowl

Fun Sushi Bowl. My daughter loves sushi. However, I find it difficult for her to have sushi for lunch. Hence, sushi cut into pieces; it would be easier for her to have. And, rolls can be hard for young children, even though they love to have sushi. Therefore, the next best idea is to have de-constructive sushi or a sushi bowl.

Fun Sushi Bowl Recipe

Fun Sushi Bowl

Japanese rice

Ingredients:

1 cup of Japanese rice

1/4 cup rice vinegar

1 tbsp olive oil

1/4 tsp salt

4 tsp sugar

Instructions:

  1. Firstly, combine all ingredients and stir. And then, turn on the rice cooker.
  2. Once done, set aside.

Fun Sushi Bowl

Ingredients:

1 medium cucumber (peel, cut to thin sticks)

6 oz imitation crab (slices)

avocado (cubed) 1 – 2

carrot (peeled, thinly sliced) 1 medium

nori (cut into small pieces) 1 – 5 pieces of

sesame seed 1 tbsp

Instructions:

  1. Moreover, do take a bowl and scoop the Japanese rice into a bowl.
  2. Then, next place the slices of cucumber on top.
  3. If you prefer soft carrots, do cook them until they are soft.
  4. Secondly, spread the carrots all over the bowl.
  5. Subsequently, place the cubed avocado and the nori all the top of the rice bowl.
  6. Further, sprinkle sesame seed on top.
  7. Finally, scoop the sauce all over the sushi bowl.

Sauce for the Rice Bowl

Ingredients:

1/4 cup of mirin

2 1/2 tbsp sugar

1/4 cup soy sauce

Instructions:

  1. Firstly, In a small bowl, add all the ingredients. Whisk. Likewise, pour over the rice bowl. (This sauce is sweet)
Fun Sushi Bowl
Fun Sushi Bowl

Sushi Bowl

My little girl loves sushi. For instance, she loves the rolls. However, the rice bowls are hearty and colorful with delicious flavors. Besides, sushi bowls are very similar to a salad where you chop up all the ingredients and throw them all in. Then, you drizzle the sauce on the top. Another thing to note, squeeze lemon juice on the avocado to prevent from turning brown. Or another thing to try, do try California rice bowl by mixing crab meat with mayo.

Do try the Fun Sushi Bowl. If you enjoy a sushi bowl, do try zucchini chips. I would love to try more fun and child-friendly snacks like pumpkin brownie bites.

Vegan Lentil Soup

Vegan Lentil Soup. At home, I am trying to have a meatless night for better health. So I want my family to have more vegetables. Therefore, I decided to try a lentil soup. Therefore, Lentil is rich in iron and is a good source of protein. Of course, why not try lentil soup, you can add a lot of vegetable in the soup. Also, this is good for the heart.

Vegan Lentil Soup Recipe

Vegan Lentil Soup

Ingredients:

onion(diced) 1 large

red peppers (diced) 1 large

paprika 1 1/2 tsp

4 cup of water

1 large potato (chunk)

2 tbsp soy sauce

2 clove garlic ( minced)

1 large tomato (diced)

1 bay leaf

2 carrot (peel and diced)

1 1/4 cup lentil (rinsed)

1 tsp sea salt

sprinkle pepper

Instructions:

  1. In a medium-size pot, add oil and sauté the garlic. Once the garlic is cooked. Then, cook the onion.
  2. When the onion is soft, add in red pepper and tomato. Next, add in water. Subsequently, do allow the ingredients to simmer.
  3. Secondly, add in paprika and bay leaf. Do stir regularly.
  4. Finally, add in carrot, potato, and lentil.
  5. Thus, pour everything in the crockpot. Let it cook for 2 – 4 hours.
  6. Then, favor with salt and pepper.
  7. Enjoy.
Vegan Lentil Soup

The Benefit of Vegetarian Meal

Eating vegetarian once a week, this will help the body feel more energized and healthier. A vegetarian once or twice per week will help to lower cholesterol. Of course, adding more fruits and vegetables will increase the antioxidant level. Therefore, the body will increase other nutrients like minerals and fiber to the diet.

Do try Vegan Lentil Soup. I would love to try more vegan dishes. If you enjoy vegan dishes, do try vegan stuffed peppers. I would love to try more vegan dishes like buffalo cauliflower bites.

Colorful Pasta Salad

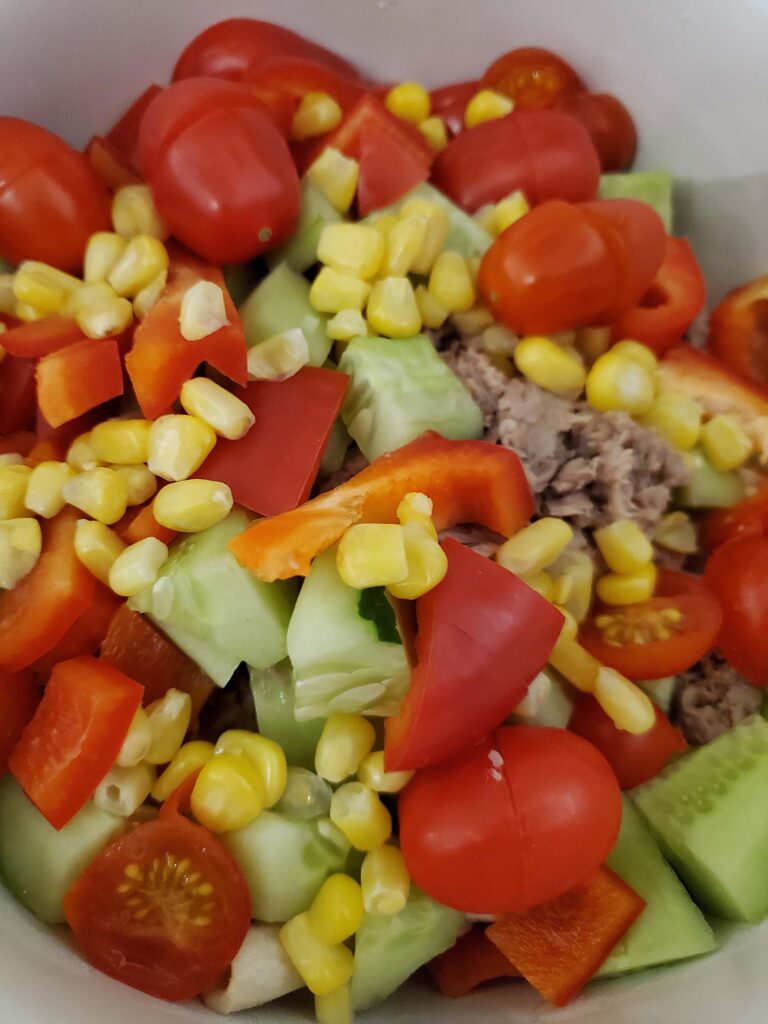
Colorful Pasta Salad. I want to make a more colorful pasta salad for my family. Dish with an abundance of color always makes me want to have more. Also, the colors are visually appealing. What’s more colorful dish is very inviting and makes you eat more.

Colorful Pasta Salad Recipe

Ingredients:

Colorful Pasta Salad

Pasta:

cube cheese 1/2 cup

cherry tomato 1/2 cup

gluten-free pasta noodle 1/2 box

cucumber 1/2 cup

1 can tuna

1/2 cup corn

1/2 cup red peppers

Viniagrette:

1/2 cup olive oil

1 tsp honey

1/4 tsp kosher salt

1/8 tsp ground pepper

Instructions:

  1. Firstly, prepare a pot of water to cook pasta noodles. Besides, sprinkle salt in the water. Then, turn on the stove and let the water boil. As well as in, pour in the gluten-free pasta noodle. For instance, stir to prevent sticking.
  2. Further, soak or wash the cherry tomato, cucumber, corn, and red peppers.
  3. Do the following, cut the cherry tomatoes into halves.
  4. Likewise, the cucumber should be cut into cubes. Next, dice the red peppers.
  5. If adding broccoli, boil the water to cook broccoli. And then, run the broccoli under cold water to have a vibrant color. Set aside.
  6. Hence, in a large bowl, add all the ingredients in a bowl. Finally, in a small bowl, add the ingredients to make the vinaigrette. Stir. Drizzle all over the vegetable and pasta noodle.
Colorful Pasta Salad

Colorful Food

Finally, why eat colorful food? Such as, if eating color fruit or vegetable often, this helps the body get the most amount of nutrient. Thus, food with color is good not only for the body but for the eye as well. Not only foods with color can be superfoods, but also other fruits like blueberry and blackberry. Again more color to the meal, it will make you more excited or look forward to your next meal.

Do try Colorful pasta salad. If you enjoy vegan dishes, do try the baked salmon dish. I would love to try new vegan and gluten-free dishes like beet salad.

Roasted Cauliflower Snack

Roasted Cauliflower Snack. Undoubtedly sometimes I find my family doesn’t have enough vegetables in their diet. Thus, I am always trying new ways to add more vegetables to their diet. It is very exciting to find a creative dish or dishes my children would love.

Roasted Cauliflower Snack

Roasted Cauliflower Snack

Ingredients:

1 head cauliflower

1 tbsp olive oil

1/2 tsp garlic powder

1/2 tsp onion powder

1 – 3 tbsp olive oil

1/4 cup parmesan cheese

sprinkle pepper and salt (flavor)

Instructions:

  1. Firstly, preheat the oven to 400 degrees F. Then, spray the pan or place aluminum foil.
  2. Before baking, soak the cauliflower and cut them into smaller sizes.
  3. In a small bowl, add in olive oil, garlic powder, onion powder, salt, pepper, and parmesan cheese. Stir.
  4. Subsequently, dry the cauliflower. Then, drizzle the ingredients all over the cauliflower.
  5. Finally, bake for 30 minutes until soft and golden brown.
  6. Enjoy
Roasted Cauliflower Snack

How to Incorporate more vegetable

Nevertheless, the best way to incorporate more vegetables is to make vegetable soup. With vegetable soup, you can add lots of vegetables and have them blended together. Lastly, do add bone broth to the vegetable soup for more nutritional value. Or, do use a spiralizer to make vegetable noodles to add with spaghetti for a pasta dish.

Do try roasted cauliflower as a snack. If you enjoy baked goods, do try a granola snack. I would love to try new gluten-free recipes like a gluten-free simple cracker with salt and pepper.

Cocoa Chocolate Brownie

Cocoa Chocolate Brownie. Moreover, my children have been having chocolate chip cookies. Whereas, I decided to make a cocoa chocolate brownie for my children for a change. Besides, both of the desserts have chocolate chips and my daughter loves them.

Cocoa Chocolate Brownie

Ingredients:

1 1/2 cup almond flour

1/4 tsp baking soda

coconut sugar 1 c

large egg 1

vanilla extract 1 tsp

1/4 cup cocoa powder

sprinkle salt

3 tbsp coconut oil(melted)

1/4 cup dark chocolate chip

Instructions:

  1. Firstly, start the oven by setting it to 350 degrees F. Place parchment paper on a loaf pan.
  2. Then, take a bowl to add the following ingredients with almond flour, cocoa powder, baking soda, and salt. Mix and set aside.
  3. Following, take another bowl, mix the sugar and oil. Last but not least, add vanilla extract and stir. Besides, add the dry ingredients. Finally, mix to combine the ingredients.
  4. At this time, pour the batter into the baking pan. Then, bake 26 minutes.
  5. Remove from the oven.
  6. Let it cool.
Cocoa Chocolate Brownie

Tips to Make Brownie

It is important, to make the best brownie by using a good quality cocoa powder. And for a fluffy texture, sift the flour for a softer taste. Furthermore, for a moist cake-like texture use eggs, which will keep the brownie moist and prevent it from drying out. When baking brownies, do not over bake, or the brownie will be dry.

Do try cocoa chocolate brownie. If you enjoy gluten-free items, do try coconut flour. I would love to cook more gluten-free dishes like strawberry shortcake.

Citrus Muffin with Cream

Citrus Muffin with Cream. My little girl always seems to love those mini cupcakes at the bakery or when we go grocery shopping. Therefore, this morning she asked me to make some. The funny thing with my son, he seems to only eat the cream on top. I know my daughter use to do, so this time I am going to make a citrus muffin rather than a cupcake. Then, I’ll add cream on top.

Citrus Muffin with Cream

Citrus Muffin with Cream

Ingredient:

1/4 water

1/4 cup coconut oil

2/3 cup almond milk

2 tbsp orange zest

8 tbsp maple syrup

1 tsp vanilla extract

2 tsp baking powder

1 1/4 cup of gluten-free flour

1/4 tsp baking soda

pinch of salt

Instructions:

  1. First, preheat the oven 350 degrees F.
  2. With a small bowl, scoop coconut oil into the bowl and place it in the microwave to warm it up.
  3. Secondly, add in water and then milk. Stir.
  4. Following, add the ingredients orange zest, maple syrup, vanilla extract, and salt.
  5. At this time, add gluten-free flour, baking powder, and baking soda. Whisk.
  6. Finally, scoop the batter into muffin tins. Bake 15 – 20 minutes.
  7. Once done, let it cool.
Citrus Muffin with Cream

Whip cream

Ingredient:

1-pint heavy whip cream

1/2 cup powder sugar

1 tsp vanilla extract

Instructions:

  1. Start by refrigerating the bowl to use to make whip cream.
  2. After 30 minutes – 1 hour, add whip cream, powder sugar, and vanilla extract into the bowl. Whisk with an electric mixer until the liquids turn to cream. Therefore, start with slow speed then work towards to the higher speed.
  3. Finally, the peak should be slowly formed.

Tips to Make Muffin

For natural sweetness, do use coconut sugar. And, for tastier baked goods do let the batter rest and cover for 30 minutes. Also, baked goods will soften. Another thing, the item will be fluffier. On the other hand, if the baking gluten-free loaf is baked past the given bake time. This removes the mushiness and grittiness from the loaf.

Do try the Citrus Muffin with Cream. If you enjoy homemade food, do try granola mix recipe. I love to try new gluten-free recipes like a blueberry muffin.

Peanut Butter Muffin

Peanut Butter Muffin. I have some ripe bananas I need to use. Furthermore, I decide to use bananas to make a peanut butter muffin. I can not forget my daughter’s favorite ingredient chocolate chips.

Peanut Butter Muffin

Peanut Buttery Muffin

ingredients:

2 large brown bananas

1 cup creamy peanut butter

1 egg

1/4 cup honey

4 tbsp. gluten-free four

1 tbsp vanilla extract

1 tsp baking powder

1/2 tsp salt

1/2 cup mini chocolate chip

Instructions:

  1. First, turn on the oven at 400 degrees F.
  2. At this time, with a large bowl add all the ingredients bananas, eggs, gluten-free flour, baking powder, peanut butter, honey, vanilla extract, and salt. Mix.
  3. Next, take a spatula to fold in chocolate chips.
  4. Secondly, brush the oil on the muffin tin or place muffin liners in the baking pan.
  5. Then, fold in the chocolate chips.
  6. Finally, bake 12 – 14 minutes.

Peanut Buttery Muffin

Tips to make the Muffin

Importantly, the peanut butter used should be soft. In particular, if you have fluffy muffins do allow egg and butter to sit at room temperature before baking. As a result, the oil used would be better than butter. Thus, the oil keeps the muffin extra most compare to butter.

Do try this muffin. If you enjoy the muffin, do try vegan omelet. I would love to try new dishes like no bake peanut butter bar.

Apple Crumbles Muffin

Apple crumbles muffin. My daughter loves muffins without a doubt, I decide to make cinnamon muffins. Also, my daughter loves to snack on them. I love the combination of apple, cinnamon, and brown sugar baked together. Furthermore, this aroma is sweet and makes the house feel very pleasant. Besides, the scent makes the house feel extra homey.

Apple Crumbles Muffin

Muffin base:

1 1/2 cup applesauce

1/3 cup butter(melted)

2 large eggs

1/2 cup sugar

vanilla extract 1 tsp

pinch salt 1

gluten-free all-purpose flour 1 1/2 cup

1/4 tsp xanthan gum

1 tsp baking soda

1/2 tsp gluten-free baking powder

1 tbsp ground cinnamon

Crumble Topping

1/4 cup brown sugar

1/2 tsp ground cinnamon

2 tbsp butter(melted

2 tbsp sugar

1/3 cup gluten-free flour

Instructions:

  1. Turn on the oven to 350 degrees F.
  2. Firstly, in the muffin baking tray, place the muffin liner.
  3. Then, in a bowl add the following applesauce, butter, and eggs. Mix well.
  4. As well as add sugar, salt, and vanilla extract. Whisk together.
  5. Soon mix in baking soda, baking powder, ground cinnamon, and then xanthan gum. The batter should be smooth.
  6. Finally, use a spoon to scoop the batter in the baking tin.

Crumble on Top

  1. Before baking the muffin, work in the crumble for the top of the muffin.
  2. Besides, with a small bowl add in all the crumble ingredients except the butter. Mix.
  3. Following, pour in the melted butter and stir together.
  4. Then, do scoop on top of the muffin, use about one tsp to one tbsp. per muffin.
  5. Finally, bake for 20minutes for 350 degrees F.
  6. Remove from the oven. Let it cool.

Convenient

Muffins are very convenient and can be taken anywhere. Thus, these snacks are easy to pack and takes very little space. As a result, muffins are great to freeze for later, if there are too many. As well as that, to make baking easier I love to put all my ingredients on the counter for easy access. Again, I like to put all my baking utensils close by as well.

Apple for Bake Goods

As well as that, If anyone has a lot of apples, there are a lot of bake dishes to make with an abundance of apples. Besides this, some of these dishes are delicious and not very difficult to make such as apple crisp, apple crumble, apple pie, apple strudel, apple crisp cheesecake, apple tart, apple dump cake, apple crumble, apple cobbler, apple cake, and apple crepe. For instance, some of these make fantastic breakfast dishes, while others are more dessert items.

Do try apple crumble muffin. If you enjoy baked goods, do try tortilla chips. I would love to try new gluten-free recipes like Hash brown cups.

Very Chocolatey Cookie

Very chocolatey cookie. My daughter can’t resist anything with a chocolate chip on it either a snack or a treat. Therefore, I decided to make chocolate chips, which contain extra chocolate chips. Whereas I don’t want to have too much sugar all the time, I would make treats with chocolate chips once in a while. Therefore, this will satisfy her taste buds and I won’t be spoiling her all the time.

Very Chocolatey Cookie

1/2 cup butter(soft)

1/2 cup brown sugar

1/3 cup sugar

1 egg(large)

1 tsp vanilla

1/2 tsp baking soda

1/2 tsp Himalayan salt

1 1/3 cup gluten-free flour blend

1/4 cup potato starch

1 cup chocolate chip

Instructions:

  1. With a bowl, melt the butter, brown sugar, and sugar. Stir. Next, add in vanilla extract and egg. The mixture should be creamy.
  2. Furthermore, add salt, baking soda, gluten-free flour blend, and potato starch.
  3. Then, add chocolate chips. Moreover, take a spatula to fold the chocolate chips into the batter. Before baking, refrigerate for one hour.
  4. Preheat the oven to 350 degrees F. Place the parchment paper on the baking tray. Scoop with one tablespoon cookie dough on the tray. Finally, with the fingers or hand round the shape of the dough to make it nice and smooth.
  5. Hence, bake for 11 – 15 minutes. Do keep an eye on the cookie when the timer hits 10 minutes. The cookie should be brown on the top.

Health Benefits

In short, this recipe uses Himalayan salt. Surprisingly, this salt has many benefit for the body. Moreover, the salt has nutritional value is therapeutic, and adds unique flavors if anyone who loves to cook. On top of all that, Himalayan salt has 84 minerals and has trace elements. Consequently, a good choice to add this salt into your diet. Furthermore, Himalayan salt is good for the respiratory system. What salt does is to remove what is in the air and to lower the sensitivity to allergies. Also, this pink salt helps to balance ph.

Do try a very chocolatey cookie. If you enjoy baked goods, do try breakfast energy cookies. I would love to try other baked goods like coconut flan.

Cheesy Macaroni Pasta*

Cheesy Macaroni Pasta. When I am short on time, I would like to have a box of Annie’s mac and cheese at home. However, I decided to make mac and cheese from scratch. Of course, I just need macaroni pasta noodles, shredded cheese, milk, or non-dairy milk and butter. As a result, this dish very simple only needs four simple ingredients.

Cheesy Macaroni Pasta

Cheesy Macaroni Pasta

1 1/2 cup gluten-free macaroni

4 tbsp butter

4 tbsp gluten-free flour

2 cup non-dairy milk or whole milk

pinch of salt

1/4 tsp black pepper

1/2 tsp dry mustard powder

2 cup shredded cheddar or marble

  1. Boil water. Then, add salt to the water.
  2. Cook the pasta noodles. Otherwise, do not overcook the gluten-free pasta can get too mushy.
  3. Certainly, take a small pot, melt butter and add in the flour. Once blend.
  4. In particular, pour in the milk and whisk together. Following, add salt, pepper, and mustard powder. Mix.
  5. Finally, add in the cheese. Stir. Finally, do wait for the cheese to melt.
  6. Turn off the stove. Add in the pasta, Stir. Be gentle.
Cheesy Macaroni Pasta

Tips to make Cheesy Macaroni Pasta

For more flavor, add salt to the water while cooking the pasta noodle. When making macaroni and cheese, better slightly undercooked and not overcooked the pasta. Gluten-free pasta noodle tends to soften very quickly. Thus, do rinse the noodle under cold water to stop the cooking.

Do try Cheesy Macaroni Pasta.

If you enjoy cheesy macaroni, do try new gluten-free dishes pork stir fry.

I would love to try more dishes or crockpot dishes like Sweet potato quiche.

Apple Crisp Gluten-free

Apple Crisp Gluten-free. My husband loves apple crisp. Before my husband, I never knew much or had an apple crisp. Previously, maybe I would purchase a box weekly from the supermarket. But, now I do enjoy making homemade apple crisp dessert regularly. Hence, the combination of brown sugar, apples, gluten-free oats, and butter is a delicious combination. Just thinking about these ingredients makes my mouth water. Without a doubt, I love the golden brown color of the dish. Therefore, the amazing crispy oats that go with the ice cream. Do try apple crisp gluten-free.

Apple crisp filling:

Apple Crisp Gluten-free

6 cup granny smith apple chunks

5 tsp fresh lemon juice

1/3 cup brown sugar

3/4 tsp cinnamon

1/4 tsp salt

2 tbsp cornstarch

Apple crisp toppings:

3/4 cup brown sugar

1/2 cup gluten-free oat flour

3/4 cup gluten-free rolled oats

1/4 tsp salt

2 tbsp coconut oil, melt

1/4 cup butter, melt

  1. Preheat the oven to 350 degrees F. Take a pan and spray with oil. Cut the granny smith apple to 6 cups chunk. Set aside.
  2. With a large bowl, add in lemon juice, brown sugar, cinnamon, salt and, cornstarch.
  3. In a separate bowl, add in brown sugar, oat flour, rolled oats, salt, coconut oil, and butter.
  4. Mix the apple with the apple crisp fillings.
  5. Spread the apple fillings in the baking pan. Finally, spread the apple crisp toppings above the apple chunks.
  6. Bake for 50 minutes.
  7. Let it cool.
  8. Serve with a scoop of vanilla ice cream.
Apple Crisp Gluten-free

Dress It Up

  • drizzle caramel or chocolate syrup on the ice cream
  • Besides the syrup, do add a little texture like nuts on the top
  • Instead of vanilla ice-cream change it up with Oreo ice cream or lemon sorbet
  • Can add a variety of different nuts like walnut or almond

Dessert

In short, no one can resist this dessert with a crunchy golden brown exterior. As a result, the best apples to choose is a crisp and tart apples like granny smith, honey crisp, or golden delicious. Also, by using other apples, the apples will be soggy and no crunch. Furthermore, it is best to remove the skin from the apple before baking them in a pan. Otherwise, if you enjoy apple dessert but do not want to spend all the time to roll pie dough, do try apple crisp instead.

If you enjoyed baked desserts, do try a breakfast cookie.

And, I would love to try new baked goods such as dark chocolate pistachio sea salt cookie.

Coconut flour flatbread

Coconut flour flatbread. It is challenging to find food my children love. Children can be very picky eaters. During the morning, my son does not eat much I want to have a healthy breakfast. In particular, I want to make quesadilla for him. First, I want to make a flatbread. Secondly, I can add either avocado and chicken or avocado with cheese.

Coconut flour flatbread

Coconut flour flatbread

2 tbsp psyllium husk

1 cup lukewarm water

1/4 tsp baking soda

1/2c coconut flour

1 tbsp olive oil

1/4 tsp salt(optional)

Instructions:

Coconut flour flatbread

The ingredients:

Psyllium husk adds a crunch. Alternately, do reduce the amount of psyllium husk, chia seed or flax seed instead. Furthermore, use almond flour in the recipe to give more flavor. Undoubtedly, this nut flour gives a nutty flavor to the flatbread. Indeed, almond flour gives the flatbread a lovely brown or golden color. Besides, the batter mix with zucchini puree will give a flexible and bendable wrap. Flatbreads are versatile and fun to eat.

If you enjoy baked goods, do try breakfast cookies.

I would love to try other breakfast recipes like oatmeal.

Cute Bear Paw Cookie

Cute bear paw cookie. Kids are funny. My daughter heard her friend having a bear paw snack. She couldn’t stop thinking about the cookie. Lately, she kept on wanting a bear paw snack. Nonetheless, I decided to purchase a box for her. Then, I decided to try making these cookies. Therefore, the next item to make on my snack list is some gluten-free bear paws.

Cute Bear Paw Cookie

Cute Bear Paw Cookie

Cute Bear Paw Cookie

Ingredients:

1 1/2 cup gluten-free flour

brown sugar 1/4 cup

unsalted butter 1/4 cup

molasses 1/4 & 1/8 cup

1 egg replacer or 1 egg (room temperature)

1/2 tsp cinnamon

1/2 tsp ground ginger

dash of nutmeg

dash of clove

pinch of salt

Instructions:

  1. In a microwave, melt the butter.
  2. With a small bowl, add in sugar, egg replacer, and molasses. Afterward, do whisk together.
  3. Next, in another bowl add in flour, spice, and salt. Mix well.
  4. Wrap the top of the bowl, store in the fridge for 1/2 an hour. This will allow the dough to stay in shape while forming the balls.
  5. Preheat the oven to 390 degrees. Then, place the parchment paper on the baking tray.
  6. Hence, Scoop the dough with a spoon. Indeed, shape the dough into a ball put on a baking tray. Then, flatten the ball slightly. Finally, do the same with three small balls for the toes.
  7. Later, bake for 10minutes.
  8. Allow the cookies to cool.
  9. Enjoy!
Cute Bear Paw Cookie

Cookie

These cookies are soft. Besides this, they remind me of a soft cake with slight spices. In particular, the cookie takes on a bear paw shape which anyone can use a cookie cutter, be super creative by drawing with icing or roll the batter into balls and shape it. Besides, children would love to bake or decorate these cookies. Thus, It should be noted that bear paw can take on a pastry form with a buttery exterior. Unquestionably, adults and kids can have a lot of fun with this.

Why not have fun with your bear paw. What type do you make? What kind do you like?

Do try the bear paw. If you enjoy bear paw, do try sweet almond loaf. I would love to try more new gluten-free snacks like gluten-free snack cracker.