Day 3 of the 7-day workout Challenge

If you want to motivate yourself to exercise, you should choose a journal or notebook you love. Why not be excited to write in it? Or, even something to decorate in it. This will encourage you to write daily. The more you write the more you encourage yourself to exercise every day. The better you feel the more you be encouraged. Day 3 of the 7-day workout challenge.

Day 3 of the 7-day workout

Photo by Li Sun from Pexels


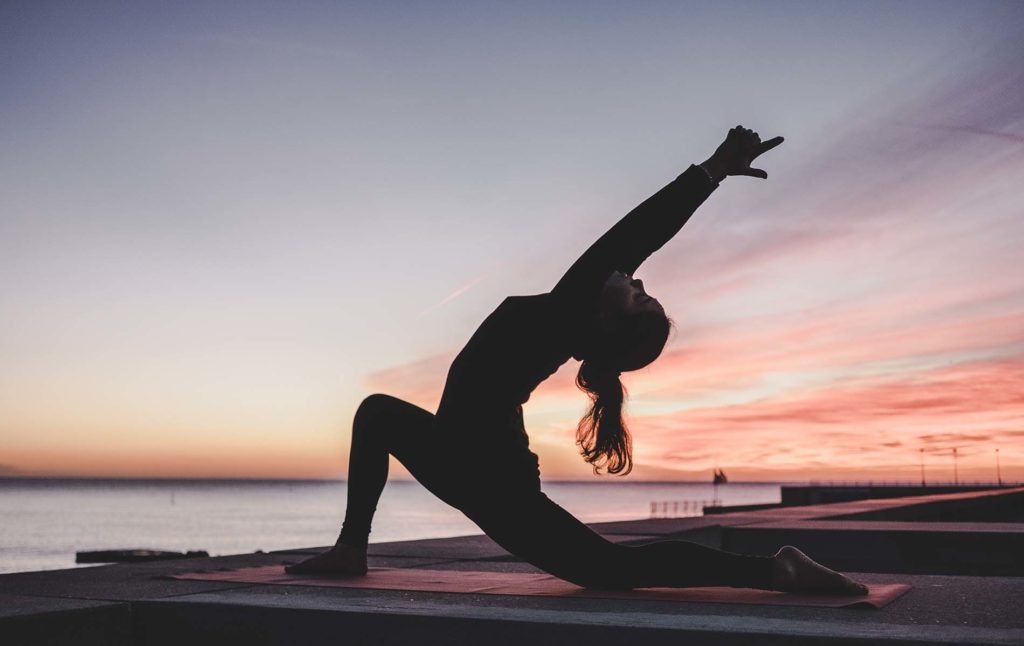
Day 3 of the 7-day workout Challenge Pilates

Pilate is an exercise with precise and controlled movement. The focus is to strengthen the body. This helps to improve the muscle and give a leaner appearance. This exercise type works on the whole body. You do not develop only in one area. It improves flexibility. Great for all ages. And Pilates helps individuals do exercise correctly. If you are worried about bulking up, you do not have to worry about this with Pilates. This type of exercise helps to build proper posture. Feel more energized the more you workout. And helps to de-stress.

Day 3 of the 7-day workout

Photo by Form on Unsplash

The one I started as a beginner

  • glute bridge
  • lying legs extension
  • side-lying leg abduction
  • back extensions
  • deadlift upright row
  • goalpost lifts
  • side-lying leg abduction
  • lying windshield wiper

I find Pilates helped with my tight muscles. I don’t stretch as much as I would like so Pilates helped with that. Pilates allow me to improve on flexibility. This prevents me from pulling something or preventing me from hurting myself. With yoga, sometimes I do worry I am not doing the correct position but I don’t have the same issue with Pilates. This is my Day 3 of the 7-day workout challenge. You should try Pilates for yourself.

Other Pilates position that I would like to work on. If you want to eat or drink healthier after exercise, how about read my post about yogurt drink.

Kabocha Sweet Creamy Soup

Now, I am always trying different recipes or ways to sneak more vegetables into my child’s diet. My son does not like carrots or cabbage. I try encouraging him by getting him to one bite even that is difficult. He is a picky eater. However, he loves soup. Why not make him a sweeter soup like kabocha sweet creamy soup.

Kabocha Sweet Creamy Soup

Kabocha Sweet Creamy Soup Recipe

Ingredients:

I medium sized kabocha

3-4 cups vegetable broth or homemade bone broth

4 garlic, minced

1 tsp sea salt

1 cup non-dairy milk

Instructions:

  1. In a medium-size pot, fill with water. Allow the water to boil.
  2. Place the squash in the water. Kabocha should take 10-15minutes to cook. Allow it to cook longer until the squash is soft.
  3. Remove squash from the hot water. Let it cool.
  4. Peel the outer layer. Cut into squares.
  5. In another pot, pour the broth. Add salt and garlic. Then, add the kabocha.
  6. Once the soup comes to a boil. Turn down the stove. Let the soup simmer.
  7. This should cook 20 minutes or pour the soup in the crockpot.
  8. Lastly, add non-dairy milk. Cook for 5-10minutes. Stir occasionally.
  9. Read to serve.
Kabocha Sweet Creamy Soup

How to Sneak in More Nutrient

  • Puree various vegetables like squash, carrot and add to soup
  • Add broth into every dish you cook
  • Make spiral noodle with a vegetable like a carrot and zucchini
  • Make smoothie to sneak in small amounts of kale and spinach
  • Add shredded vegetable into pasta sauce
  • Minced vegetable in a processor to add into omelets
  • Bake vegetable dish with melted cheese
  • Drizzle balsamic vinaigrette to vegetable
  • Added shredded vegetable in the batter of a baked loaf of bread or muffin

What to Know About Squash

How to choose a kabocha squash. You should choose one that feels heavy. Make sure there are no soft areas on the squash. Kabocha is hard to cut with a tougher skin. Be very careful. Take a knife by starting in the middle of the squash. Rock back and forth with your body weight to slowly cut the squash. Continue until you cut the large pieces. The seeds in the center can be eaten as a snack. You can put this aside.

My children and I like this soup. The soup is sweet and creamy. They had a lot. You should try this soup kabocha sweet creamy soup a try.

You might want to try Asian soup for fall. My family loves soup for the fall or even year-round. Maybe the next one I would like to try is a broccoli kabocha soup.

Day 2 of the 7-day exercise challenge

Day 2 of the 7-day exercise challenge

What I did I do on day 2? I did not have as much time. This is not surprising being a mom. I want to make time. I turn on my timer for 10 minutes to ready for a jog. Then, at home on a spot or I jog around the house. I can turn on my favorite series while jogging at home. The time goes faster when you are occupied. This is my process for my day 2 of the 7-day exercise challenge.

Yoga

Yoga is an extremely important part of the exercise before and after a jog. After jogging, I spend a small amount of time to do yoga. Yoga helps to prevent injuries. Different poses aim to target different parts of the muscle. This forces you to slow down which can be very difficult. Yoga helps to reduce stress. Not only that but yoga helps with the focus.


The Beginning

When you start exercising, the first couple of days might feel tough. However, if you kept on wanting to give up, remind yourself how you would feel after a workout. Or, treat yourself to something you would enjoy. This would encourage you to exercise. I don’t know if you have ever heard about bullet journals but it helped me. I find putting together a chart in the bullet journal and each time I workout I would mark it down. This helps to encourage me to exercise every day. When I mark it down, it is very fulfilling. And this pushes me to exercise more.

Day 2 of the 7-day exercise challenge

This is my day 2 of the 7-day exercise challenge. What would you do to challenge yourselves for a good workout, even just 5 to 10 minutes would help.

If you need help to de-stress, do try aromatherapy it is very soothing.

Things to think about after a good workout.

Mo Gwa Soup for inflammation

Mo Gwa Soup for inflammation

I love to make soups every week. It is getting chilly. Nothing like a warm bowl of soup. My daughter needs to drink soup weekly to boost her gut health. And bone broth will help to continue to improve her skin condition and her food sensitivity. The bone broth is good for the gut. The broth gives iron, mineral, collage, and is full of nutrients. Do make mo gwa soup for inflammation or to have bone broth regularly.

Mo Gwa Soup for Inflammation Recipe

Ingredients:

300g pork rib

1/2 hairy gourd

6 dried red dates6-8 cups of chicken broth or bone broth(homemade or store-bought)

salt and pepper

a small handful of barley

2 slices of ginger

Instructions:

  1. In a small saucepan, fill water. Bring water to a boil. Add pork bones. Allow the pork bones to boil. Turn off the stove. Toss the water.I
  2. In a large soup pot, add broth into the pot. Allow the broth to boil. Add pork bones into the pot. Let it boil.
  3. Add all the ingredients to the soup pot. Once the ingredients bubbles. Lower the temperature. Allow the soup to simmer.
  4. Do allow the soup to cook for 3 – 4 hours. Season with salt and pepper.
Mo Gwa Soup for inflammation

Know the Vegetable

Mo gwa is not a squash. It is a gourd. Did you know it is in the same family as winter melon? To remove the hair on the surface and the seeds on the inside. The center or the seeds can be quite tough. The gourd does not have a strong flavor. It is high in fiber. The soup has a sweet taste. Good for inflammations.

Better health with Mo Gwa Soup for Inflammation

Do have Mo gwa soup weekly. The Mo gwa soup is good for every season. Some Chinese soup is only good for winter or spring but you can have this soup all the time. This soup is great for everyone who has a weak body. If you feel dehydrated, this soup would help with this. Mo gwa can be cooked differently like cut into ring size steamed with ground pork on top. Do try Mo gwa soup.

If you want to strengthen your immunity, please try bone broth for your immunity recipe.

Next, I might try other immune-boosting soup recipes.

7 day workout challenge

At home, I have always done some minor exercises. Whenever I Have some time I would do some exercise like a couple of minutes of Pilates, aerobics, or yoga. However, I find that the amount of exercise is not enough. I feel like I need to do some more. I decided to challenge myself to a 7-day workout challenge.

Taking a Toll

This September, both of my children are in school. I decided to keep them occupied by signing my children for more activities. My children are quite energetic I felt I need to keep them busy with activities. I believe the regular school, activities, and all the running around are taking effect on my body. Also, I still need to do my regular mommy duties. All these add up. I believe I need the 7-day workout challenge.

7 day workout challenge

Issue

I find I am extra grumpy dealing with my kids. I feel I needed some kind of outlet. Or, an intense workout to release some stress. My children don’t give me any breaks. They want something every 5 minutes. My daughter either wants a snack one minute. Then, she is asking to go to the playground next. I feel I don’t even have time to catch my breath. Constantly, I am reacting or doing rather than having any time to think. It is extremely exhausting.

The first week

My goal for the first week is to take baby steps to improve my stress level or improve my health. I want to start slow. First, I walk and slow jog around my block. I aim to jog for 7 days straight. Therefore, this is my 7-day workout challenge to push myself to run for 7 days straight. Hopefully, I will slowly increase the amount of time I run as well.

7 day workout challenge

I am inspired to do more stretches or yoga to improve my body’s flexibility.

When exercising it is important to snack on healthy snacks, try these energy bites.

Strawberry Breakfast Pancake

I always have trouble deciding what type of breakfast to make for my kids. They do get bored very easily. What should I make that is different and new often for my kids? Something healthy and tasty. My daughter loves strawberry. Anything with strawberries. Why not a Strawberry breakfast pancake.

Strawberry Breakfast Pancake


Strawberry Pancake Breakfast Recipe

Strawberry Breakfast Pancake

Ingredients:

2 tbsp. sugar

1 egg

1 cup gluten-free flour

1 tbsp. baking powder

3/4 cup milk

2 tbsp. vegetable oil

1 tsp vanilla extract

1/4 tsp xantham gum

1/4 tsp salt

1 banana(mashed)

1/2 cup strawberry (slices)

Instructions:

  1. Do some preparation. Mash the banana. Slice the strawberries.
  2. In a bowl, add dry ingredients. Mix well.
  3. In another bowl, add the wet ingredients. Combine.
  4. Combine the dry and wet ingredients.
  5. Set the bowl aside.
  6. Turn on the stove. Add oil. Use a large spoon to scoop the batter on the pan.
  7. Add slices of strawberries evenly spread out on the pancake.
  8. When one side is done. Flip the pancake. Once both sides are evenly brown. It is ready.
Strawberry Breakfast Pancake

Fun Ways to Have Pancake

  • Cook strawberries with sugar to make a strawberry syrup to drizzle on top of the pancakes
  • Chop strawberry into little pieces to mix with the batter to make it a very strawberry pancake
  • Make a fun breakfast skewer: mini pancake, a slice of banana, mini pancake, with a slice of strawberry, mini pancake, a slice of banana, and mini pancake
  • Pancake sandwich: one pancake with a thin slice of strawberry with whip cream, syrup and another slice of pancake


Strawberry breakfast pancakes are fantastic breakfast items. They are versatile. You can make multiple layers of strawberry pancakes. Or, you can even use it as a dessert dish. First, the pancake, spread a layer of cheesecake filling, pancake, fillings, and continue with as many layers as you like. Then, add strawberry toppings on the top with some whipped cream. On a lazy day, a simple layer of pancakes with your favorite toppings.

If you like the fall, do try my crockpot apple cider recipe.

I would love to make breakfast scones.

Sore Throat Soothing Gummies

These two weeks my kids have been getting each other sick. My poor daughter was coughing so much her throat probably felt raw. She wasn’t feeling well; her throat hurt. My poor little one. I turn on the humidifier in the evening for her and added 4 drops of lemon and eucalyptus essential oil. Maybe the next thing to do is to make sore throat soothing gummies or drops.

Ingredients

lemon juice:

helps with the digestive system and to build the immunity. lemon juice has potassium, vitamin B, vitamin C, calcium, magnesium, and antioxidants. Lemon gives energy and is good for hydration.

ginger:

ginger is good for antioxidant properties and anti-inflammatory.

honey:

honey improves cough symptoms and helps with sleep.

Sore Throat Soothing Gummies

Sore Throat Soothing Gummies Recipe

Ingredient:

2 cup of water

1-inch piece of ginger

1/4 cup of lemon juice

3 tbsp. and 1tsp of honey

4 tbsp. gelatin Knox

Instructions: 

  1. In a small pot, add water and ginger. Let it boil. Once water boils turn to low heat. Cook for 20 minutes.
  2. Remove ginger. There should be 1 cup of water remaining. Add lemon and honey.
  3. Let it cool.
  4. Add gelatin one packet one at a time.
  5. Use a spoon to scoop the mixture into a mold.
  6. Put in the fridge for 15 minutes.

My Son

My love gummies. He enjoys the sore throat gummies and he couldn’t stop eating them. There are other ways to help with coughing or a sore throat like leek soup. Something soothing for the throat. Leek juice relieves flu and cold symptoms. Not only does it help with colds, and leek will help with focus and energy. Do give these sore throat soothing gummies a try if you are not feeling well.

Some ways to build immunity, please take a look at this article.

There are other foods to build immunity, please take a look at this article.

My Daughter’s Vanilla Moist Cake

My daughter’s vanilla moist cake. All she cares about is her birthday cake. She loves cream and maybe the chocolate decoration on top of the cake. Before we have the time to cut the cake she is trying to get the chocolate pieces. Kids. This time I want to make a memorable cake for her. Maybe a princess theme. I don’t have a lot of experience. This time I am trying to make my daughter’s vanilla moist cake with a cream cheese frosting.

Cake

Before I made makes, I made cupcakes which she enjoys. They can be fun. Good size for kids. It can be a little easier with someone like me who is not very experienced with cakes. I decided to venture to more of a regular cake. I love the Food network. These experienced or home baker made these amazing cakes. I am inspired to attempt at a cake. You need to start somewhere. With my daughter’s vanilla cake.

Moist Cake

Ingredients:

2 1/2 cup of all-purpose flour

1 cup of sugar

1/2 tsp baking soda

1 1/2 tsp baking powder

1 tsp salt

2/3 cup shortening

1/4 cup butter

1 cup sour cream

1/2 cup milk

6 egg whites

Instructions:

  1. Preheat oven 325-degree fahrenheit.
  2. Grease two 8inch round cake pans.
  3. In a bowl, mix sour cream, milk, vanilla, butter, and egg whites.
  4. In a separate bowl, add flour, baking soda, salt, and baking powder.
  5. Add shortening and butter. They will be in chunks. Mix with flour mixture.
  6. The mixture should be crumbly.
  7. Add in half of the liquid mixture. Combine.
  8. Mix for 10-15 minutes.
  9. Do not overbeat.
  10. Pour in cake pan.
  11. Bake 325 degree far for 45 minutes -50 minutes.
  12. Let it cool.

Cream cheese frosting

Ingredient:

1/2 cup powder sugar

1 tsp vanilla extract

8 oz cream cheese(room temperature)

1/2 cup butter(room temperature)

Instructions:

  1. Add all ingredients in a bowl.
  2. Mix to combine.

Delicious Cake

I enjoy the taste of the cake. My children decorate with pink sprinkles. They had too much fun. The appearance does not look as appealing but the cake tastes good. Not too heavy or too sweet. This is the second cake I have made. Next time, I would like to decorate the cake with cream roses. Do try my daughter’s vanilla moist cake.

You like to read about my gluten-free chocolate chip cookie recipe.

I would like to try piping rose.

Crockpot Warming Apple Cider for the Fall

The weather is changing quickly. It is getting colder. The fall is here. I have been having a busy September with the new school year. This has been non-stop busy. I love having a warm beverage in the fall. Nice soothing cozy drink. My husband always has a nice cup of apple cider during the fall. The entire house has a lovely aroma when the apple cider is cooking. Crockpot Warming Apple Cider for the Fall


The Fall

I love this crockpot warming apple cider for the fall. This recipe is simple. Great for busy moms. You throw them in the crockpot and forget about it. Mulled beverage feels like the fall season. The aroma smells wonderful. If you add a slice of orange and cranberry in the crockpot. The crockpot looks nice and bright. Very cheerful. The color makes very festive. Nothing like sitting in front of a fireplace with a warm cup of beverage.

Crockpot Warming Apple Cider for the Fall

Crockpot Apple Cider

Ingredients:

8 gala apples

1/2 cup brown

sugar

4 sticks of cinnamon

1 tsp allspice

1 tbsp. clove

10 cup of water

Instructions:

  1. Cut apples into quarters. Put in crockpot.
  2. Put in cinnamon sticks, whole cloves, allspice, and water
  3. Let the crockpot cook for 3 hours on high.
  4. You can mash apple for more flavors. Add in brown sugar.
  5. Cook for another 1 – 3 hours.
  6. Remove solids. Pour the liquid in a jug.

Note: this last in the fridge for one week.

Why you would love crockpot apple cider?

  • Fantastic for chilly days
  • no artificial sweetener
  • use fresh fruits
  • great for all ages
Crockpot Warming Apple Cider for the Fall

Things to make Cider Flavorful

  • Can add pears to make it sweeter
  • If you like more flavor, add more spice like star anise or nutmeg
  • You can make it healthier by switching to honey or maple syrup
  • You can have this as a gathering with friends or for adults with alcohol

Apple cider is a delicious beverage. My children enjoy a cup because apple makes it sweet. This drink contains vitamin C and antioxidants. Great for the heart.

If you like this recipe, you might want to try yogurt bark snacks.

Next time I would like to try making creative birthday cakes for my kids.

Drinkable Yogurt for Breakfast

My children have always love drinkable yogurt. I would buy some once a month on my shopping trip. My children of course especially like the Paw patrol drink yogurt. Lately, my children have been a little more obsessed than before. I have been buying yogurt drink non-stop. Therefore, why not make my own. Make drinkable yogurt for breakfast. These drinks are similar to smoothies.

Drinkable Yogurt for Breakfast

Having a drinkable yogurt, I find to have a healthy probiotic drink is quick and easy to have. When you make your own you can put less sugar and make a healthier choice like choosing honey. Depending on the fruit, you can give your body a healthy nutrient. Children need their calcium and drinkable yogurt will help with this. My daughter’s Naturopath Doctor address the importance of a healthy gut. Gut health can improve food sensitivity.

Recipe

Ingredient:

3/4 cup of Liberte yogurt

3/4 cup of milk

splash of vanilla

1 banana

Drinkable Yogurt for Breakfast

Instruction:

  1. In a blender, add in all the ingredients. Allow it to combine together.
  2. Once done.
  3. Enjoy

What to look for in a yogurt

What to look for in a yogurt. Yogurt should have mainly both milk and probiotic cultures. The yogurt will have vitamin D and Calcium needed for your body. To avoid added sugar. The added sugar makes yogurt unhealthy. Too much sugar does hurt the body’s health. The yogurt selected should not have added sugar. Yogurt already has natural sugars so no need to add an additional amount. The best flavor is one without any flavor.

Live Cultures

Probiotic bacteria help to make yogurt. It turns sugar into lactic acid that gives yogurt the sour taste.

Yogurt Drink

My children love the pineapple mango yogurt drink. Do you have any favorite ones? There are various other flavors you can make like vanilla, strawberry, peach, blueberry, and papaya. You can always experiment to see what combination you would like.

If you want to eat healthier, you might want to snack on yogurt bark treats.

What would I like to try? I would love to try crockpot blueberry casserole.

Time for Donut Snack

I love trying new recipes. Experimenting with new ones, I enjoy making what my children like to eat. My children can be snack monsters. It is always good they have good appetize and loves to eat. My mom loves trying new dishes I believe I got this from her. Therefore, I love the challenge of trying to make something different or new. It is fun. Sometimes it can be stressful but once you get this it is very rewarding. This time is time for donut snacks.

Time for Donut Snack

Love of Sweets

Lately, my son seems to have a love for donuts. Timbites. He loves the little donut with fillings. He is little. Timbites are prefect size for him. And, my son can eat a lot of the Timbits. They are easy for him to eat and not messy. Nothing like making homemade donuts. There is always time for donut snack.

Fun Facts about Donut

  • The glazed donuts are the most popular donut
  • How Small bite-size donut came to be. The small donut came from leftover dough in the middle of the donut.
  • The word ‘doughnut’ is the correct word and ‘donut’ is acceptable as well
Time for Donut Snack


Time for Donut Snack

Donut Recipe

Ingredient:

1 1/2 cup of whole wheat all-purpose flour

1/3 cup sugar

2 tsp baking powder

1/2 tsp salt

1/2 tsp ground nutmeg

1 large egg

1/2 cup whole milk

2 tbsp. unsalted butter

oil for frying 1/2 – 1 cup

1/2 cup sugar(sprinkle on top)

Instruction:

  1. In a bowl, add flour, baking powder, salt, and nutmeg. In another bowl, combine egg, milk, and butter. Combine.
  2. Put the dry ingredient in. Mix to combine.
  3. In a small pot. Add oil. Warm oil to 375 degrees Fahrenheit.
  4. Use a small round ice cream scoop. Cook five to six donut at a time.
  5. Flip to allow the other side to cook. Once the donut turns brown. Cook for 1-2 minutes. The donut is ready.
  6. Once done. Place on a paper towel. Sprinkle sugar on top. It is time for donut.


Tips for Donut Making

Before frying donut, make sure there is enough oil in the pot. About one cup of oil or more. Don’t let donut hit the bottom of the pot when placed in the pot.

The frying temperature should be 360 – 375-degree Fahrenheit

Love for Donut

Donut is fun to eat. Not only my children love them. I have fun eating them. Sometimes Mom needs a little sugar to deal with the high energy kids. There is always a time for donut snack.

Next time I would love to try a gluten-free donut hole recipe.

You might want to look at my other bake good recipe.

Healthy Soft Loaf of Bread

I started making gluten-free bread due to my daughter. This started when my daughter became sensitive to gluten. In the past, I never made a loaf of bread until gluten-free bread. I didn’t know the basics of making a regular loaf of bread. I still struggle with the rise of the loaf. However, the tip that helped me is to set the oven at 200 degrees F for 30 seconds. Then, turn off the oven. Place the loaf in the oven for 30minutes. This helped me with a healthy soft loaf of bread.

Healthy Soft Loaf of Bread

Now, I want to attempt at a regular loaf of bread. The healthy soft loaf of bread. Making a regular loaf of bread can be stressful, a regular loaf would bring me some comfort, and this might help me to understand more about bread. I love a loaf of bread. It is soft, fluffy, and moist. My favorite is to make bread for a sandwich. It is comforting to make gluten bread. Something easier than gluten-free bread.

Healthy Soft Loaf of Bread

What to Know About Yeast

Yeast is a saccharomyces cerevisiae. Yeast consumes starch and sugar and pass gas. Yeast breaks down grain.

There are four Types of Yeast

There are four types of yeast: dry, instant, fresh, and wild. The more common ones are dry and instant. Dry yeast has been ground to form into granules. The yeast is not active. Once activated it will eat the starch. How to activate the yeast. Mix yeast with water and sugar. Wait for 10 minutes. This becomes bubbly. And activated. Instant yeast can be activated by mixing up with dry ingredients.

Learn About Gluten

Gluten is in wheat, barley, and rye. Flour is a protein in a resting stage. When the liquid is applied, it reacts. Need to be careful with gluten. Too much work on the dough will affect the texture.

Healthy Soft Loaf of Bread

Healthy Soft Loaf of Bread Recipe

Ingredients:

1 1/4 cup of milk

1/3 cup of old fashion oat

1 tbsp. honey

2 1/4 tsp quick rise yeast

3 tbsp. butter

2 cup bread flour

3/4 cup whole wheat flour

2 tbsp flax seed

1 tsp salt

2 tbsp sunflower seed

1 tbsp sesame seed

1 tbsp poppy seed

topping:

2 tbsp old fashion rolled oat

1 tbsp sunflower seed

Instruction:

  1. In a bowl, warm up milk to about 115 degrees F
  2. Add in oats, yeast, and honey. Let it sit for 5 minutes.
  3. Then, add butter. After butter, add in bread flour, whole wheat flour, flaxseed, and salt. Mix well.
  4. Do add sunflower seeds and sesame seeds. Mix together.
  5. Mix with the hand for 10minutes.
  6. Cover the dough. Let the dough rise for 60minutes.
  7. Once it reaches 60 minutes. Spray the loaf pan. Knead the dough.
  8. Cover loaf again with the towel. Allow the dough to rise for 60minutes.
  9. Once the dough reaches 60minutes. Turn on the oven to 350.
  10. You can add sesame seed and sunflower seeds on the top of the bread.
  11. Bake for 35minutes.
  12. Allow to cooling for 10 minutes.
Healthy Soft Loaf of Bread

Healthy Soft Loaf of Bread

My favorite meal is to have a lovely sandwich during lunchtime. Nothing like a soft loaf of bread. It is a lot of fun to make your sandwich bread. A slice of turkey, some spinach, slices of gooey cheese with a crunch from the toasted bread. You should try this healthy soft loaf of bread.

Next time I should attempt at a recipe for soft multigrain bread. 

You can take a look at the gluten-free recipe I had tried.

Rubble Paw Patrol Birthday Cake

My son’s birthday is coming up. I want to do something fun and different from what I usually do. Now, is getting older and is more aware of things. His favorite cartoon character is Rubble from Paw Patrol. I think it would be fun to make the theme a Paw patrol one. He will be very excited. Rubble Paw Patrol Birthday Cake

Rubble Paw Patrol Birthday Cake

Cake Base

I used my gluten-free, dairy-free, and egg-free chocolate cake recipe. You can find my recipe here. Or, you can use a cake recipe you like or is comfortable with.

Chocolate Buttercream Frosting

Ingredient:

1 cup butter

2 cup powder sugar

1 tsp vanilla extract

1 cup semi-sweet chocolate chip

Instructions:

  1. In a bowl, use an electric mixer to mix the butter on medium speed. Blend until fluffy.
  2. Slowly add sugar little by little. Mix until creamy. Add vanilla extract.
  3. In a small pot of water, place the metal bowl with chocolate on top. Turn on the stove. Stir regularly until melted. Once done put aside.
  4. Add the mixture with the chocolate. Combine.
  5. The frosting is ready to be used.

Note: If refrigerated the butter will harden. Place the frosting in room temperature to soften the frosting.

What You would Need

  • 9 bars of kit kats
  • 1 box of Dad’s chocolate cookies
  • 1 bag of Maltesers
  • 2 bars of coffee crisps

The Preparations

  • blend the Dad’s cookies into crumbs
  • Split the Kitkat bars into individual bars
  • Cut the Coffee crisps into chunks

Cake Assembly

  • Chill the cake
  • apply a trail of Dad’s cookie crumbs where you would want Rubble on
  • place the chunks of the coffee crisp in a path
  • Place Maltesers balls all over the top of the cake

Rubble Paw Patrol Birthday Cake


This is how I assemble the Paw Patrol Rubble Construction Cake. Next time, I might use OMG clusters to give an uneven surface for the cake. I might break the Maltesers apart. You can be as creative as you want. I find this fun. What have you tired? What would you do? Any suggestions? for the Rubble Paw Patrol Birthday Cake?

Decluttering My Messy House

Lately, my kids have been creating a mess everywhere. When I am attempting to clean one area, the kids make a mess in another area. Is there a point of cleaning the house? I hardly have any time to clean and whenever I get a chance; the kids would mess up the area I just cleaned. Will I have a messy house forever? How should I declutter my messy house?

Just Don’t Have Time

My children tend to be very energetic kids. I try to keep them busy with classes or more playtime at the playground. I want to minimize screen time. And I want them to have more physical activities. I tend to take my children out very often. Therefore, I do not have a lot of time.

Baby Steps

What I did was to start small. I spend 10-15 minutes cleaning something from my cleaning list. I have a page in my planner with a list of the area I need to tackle at home. Start small, maybe one to two item off the cleaning list. Then, slowly increase the amount.

One Room at a Time

The aim is to give yourself a 15-20minutes and a bag. Pick a room. I like to start with my kid’s room. Throw anything broken or with missing pieces. Anything the kids have that does not play with anymore.

Decluttering My Messy House
spray

Plan of Attack

  • Take pictures of treasured items rather than to keep them
  • Remove duplicate items to clear up space
  • Unused items take up space do throw away


Wipe Down

Homemade All-Purpose Cleaner

Ingredients:

1/4 cup Dr. Bronner’s liquid castile soap

25 drop of essential oil of your choice

16oz spray bottle

water

Instructions:

  1. In a spray bottle, pour in Dr. Bronner’s liquid soap and essential oil.
  2. Then, add water. Shake to have everything mix together.
  3. It is ready to use.
Decluttering My Messy House

Next Step

After decluttering the mess. Do give the room a quick wipe with homemade natural all-purpose cleaner. This will wrap up the cleaning process. Let me know what works for you with decluttering your house. This is how I work on decluttering my messy house. Give it a try and see how this works for you.

If you interested in learning more about natural cleaning products, please take a look at this blog post.

And, if you are interested in natural products, you might want to take a look at my post about natural bubble bath.

Homemade Vegetable Broth From Scraps

I am trying to reuse what I have and to reduce any waste. I am attempting to feed my family with a lot of vegetables but it seems very wasteful with the vegetable peel, root, and ends thrown away. I want to try to reuse the scraps to make broth or composite or repurpose it. My family loves noodle soup, so I decided to make vegetable stock from scraps first. Homemade Vegetable Broth From.

Vegetable Broth From Scraps
sea of vegetable

What vegetable scraps good for broth

Scraps and peels should be used:

onion

garlic

shallots

carrots

bell peppers

mushroom

celery

herbs

potatoes

leeks

squash

asparagus

What vegetable scraps to avoid?

Scraps and peels to avoid:

Cabbage

Brussel sprouts

Broccoli

Cauliflower

Turnips

rutabagas

artichoke.

Note:

last time, I put kale in my broth which turns out quite bitter. You can add some like a leave or two but too much can be extremely bitter.

Vegetable Broth From Scraps
vegetable scrap

How to Store Vegetable Scrap

When I prepare meals, there would always be peels from the skin or roots from the vegetable. What I do is to keep a Ziploc bag on the side and to label vegetable scraps and place it in the freezer. Daily when I prepare dinner, I use a lot of vegetables like carrot or onions. Most of the time the carrot skin goes in the organic. Now, I would save it in the Ziploc bag. Lately, I have been taking the celery ends in the garden to make it grow. Let’s see how that turns out.

Vegetable Broth Recipe

Ingredients:

1 tbsp. olive oil

2 garlic(minced)

1 large onion(chopped)

2 rib of celery(chopped)

3 carrots(chopped)

500ml water

3 cups of vegetable scraps

2 bay leaves

sprigs of parsley and thyme

salt and pepper for flavor

Instructions:

  1. Turn on the stove, once warm add olive oil.
  2. Add in garlic, stir once in a while to not let it burn.
  3. Once the garlic is cooked. Add in onions, celery, and carrot. Cook for 5-10minutes.
  4. In crockpot, put in the vegetables. Add water. Then the vegetable scraps, bay leaves, parsley, and thyme.
  5. Let the broth cook for 2-3hours.

My goal for this year is to make more homemade vegetable broth from scraps for my children and my husband. I want to build their immunity by adding more greens to their diet. More greens equal more energy. I want to have more control over what type of vegetable and the amount I can add to the broth especially with the salt content. Too much salt affect the body absorbing calcium. Also, this affects water retentions. Do consider making homemade vegetable broth from scraps.

If you would like to read more about ways to build your immunity, you can read about vinegar topic.

Sometimes thinking more positive can also affect our immunity.

Cream to Help With Sleep

Do you get overwhelmed? Do you have too many things on your mind? Or, you try to calm your mind. Thoughts are all over the place. Maybe, after finally falling asleep, once you wake you can’t seem to have restful sleep. Why don’t you try cream to help with sleep?

Cream to Help With Sleep
Cream

Cream to Help with Sleep

Ingredients:

2 1/2 tbsp. coconut oil

1 tbsp. grapeseed oil

2tbsp beeswax

12 drops of lavender essential oil

12 drops of cedar essential oil

Instructions:

  1. In a bowl, warm coconut oil in microwave and beeswax. Once mixed. Add essential oils. Mix well.
  2. Put in a container after mixed. Allow it to solidify.

Teas to Help with Sleep

  • Chamomile tea help with nerves
  • St John’s wart help with depression
  • Valerian Lower anxiety and help with relaxation. Short term use.
  • Kava helps with relaxation. Short term use.
  • Passionflower this flower is a light sedative.
  • Melatonin hormone help with control with sleep and wake.
  • California Poppy help remove anxiety. Feel rebuild.

Cream to Help With Sleep
moisturing cream

Things to do and not to do

Things to do:

Consistent sleep habit

  • exercise 30minutes a day (strenuous exercise in the morning and light yoga in the evening)
  • need a lot of natural light
  • Journal to keep by the bed to write about your worries

Things to not do:

  • No caffeine after 12 pm
  • limit on wine during dinner time
  • nothing stimulating before bedtime
  • no big meal close to bedtime
  • no device in bed

Pressure Points to Help with Sleep

There are various pressure points. There are certain points to help with sleep. One of the pressure points is called the spirit gate. This point is a crease on the outer wrist. It is below your pinkie. On a hollow area, apply pressure with circle movement in an up and down motion. Do this for 2-3minutes. Hold on the left side of the point with gentle pressure. Do the same on the other side.

Do try cream to help with sleep. Sleep is very important. With not enough sleep, little things do tend to irritate you. Not well-rested, the body has a harder time to fight any cold season. The mind has a harder time to focus.


If you would like to read more about natural remedies, for example natural lip remedies for dry lips. Please read here.